Sculpey Soufflé Autumn Quirky Fox
Create your own Quirky Little Autumn Fox. Decorate your holiday table with this cute little critter to greet the season.

Credits | Sculpey | swirlydesigns
What you need
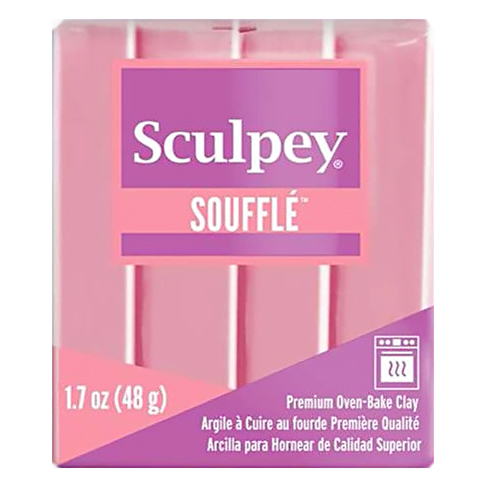
- Sculpey Soufflé Pumpkin
- Sculpey Soufflé Poppy seed
- Sculpey Soufflé Canary or Fimo Soft 16 Sunflower
- Sculpey Soufflé Cowboy or Fimo Soft Chocolate
- Sculpey Bronze or Fimo Effect Metallic 71 Bronze
- Sculpey Gold or Fimo Effect Metallic 11 Gold
Additional Supplies
- Mini heart cutter
- 38mm Oval shape cutter
- Black eyelets
- Toothpick
- Small circle cutter – optional
- A comb or a Sculpey stippling tool
Before you begin, here are some tips!
- Do not use unbaked clay on unprotected furniture or finished surfaces.
- Start with clean hands and work surface area. Good work surfaces include wax paper, metal baking sheet, a ceramic tile, or disposable foil.
- Knead clay until soft and smooth. For best results, clean your hands in between colors.
- Shape clay, pressing pieces together firmly.
- Bake on oven-proof glass or metal surface at 120°C for 30 minutes.
- For best baking results, use an oven thermometer.
- DO NOT USE MICROWAVE OVEN.
- DO NOT EXCEED THE ABOVE TEMPERATURE OR RECOMMENDED BAKING TIME.
- Wash hands after use.
- Baking should be completed by an adult.
- Begin by preheating oven to 120 °C.
- Test temperature with oven thermometer for perfectly cured clay.
- For best results, condition all clay by running it through the Clay Conditioning Machine several passes on the widest setting.
- Fold the clay in half after each pass and insert the fold side into the rollers first.
PROJECT INSTRUCTIONS
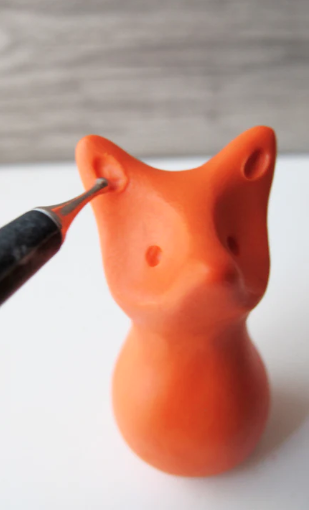
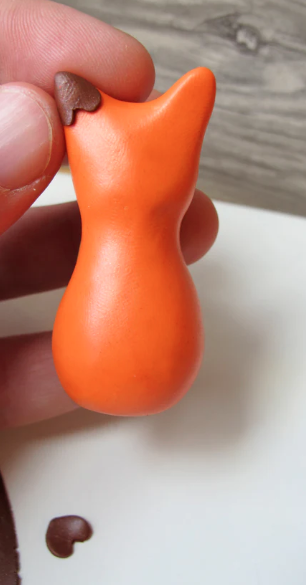
Start with Sculpey Soufflé Pumpkin. Use your hands to roll out a 5cm high bowling pin shape out of the mixed clay. Then with your pointer finger and thumb pinch out two ears and a snout. Take your 12mm stylus tool and make indents on each side of the nose for the eyes. With the 2mm stylus tool make the eyes holes and tear drop shape for the ears.
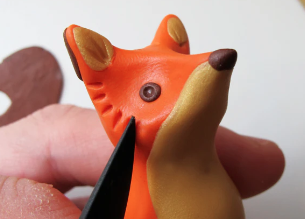
Run a piece of Fimo Effect Metallic 11 Gold on the #6 setting of your conditioning machine. Cut out an oval shape with your 3,8cm oval cutter for the under the nose/belly of the fox. Attach the oval shape under the nose and drape the rest over the belly and burnish it down with your finger. (If your oval is too big trim the oval down. If the oval doesn't reach the bottom of the fox you might want to stretch out the oval to reach.) Roll two small tear drop shapes for the insides of the ears.
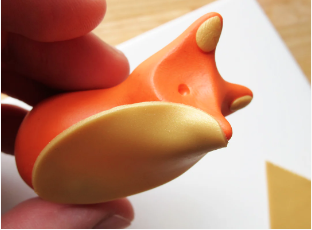
Mix together a piece of Fimo Soft 75 Chocolate ( or Sculpey Soufflé Cowboy ) and Fimo Effect Metallic 71 Bronze and run a small piece on the #6 setting of your conditioning machine. Use your mini heart cutter and cut out two hearts and attached to the back of the ears. Then roll with your fingers two small balls for the eyes and a ball for the nose and attach.
Take your clay knife tool and create texture on your fox to represent fur, around the eyes and all over the back of your fox.
Cut a toothpick in half. Insert into the side of your fox (for the arms). Mix together another small piece of Soufflé Pumpkin to match the color of the fox and run your piece on the #5 setting of your Clay Conditioning Machine. Cut a square piece the length of the fox arm with a x-ato knife or a polymer clay blade, then wrap the clay and press. Trim excess of the clay off. Repeat for second arm. Roll two small balls with a piece of the mix Bronze & Chocolate clay and attach it to the end of each arm to create hands. Use your clay knife tool to make fingers.
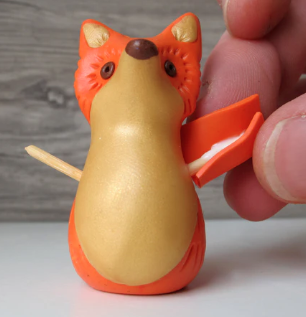
Cut down your Black eyelets to about 1,9cm long. Save excess part for later. Insert in to each arm.
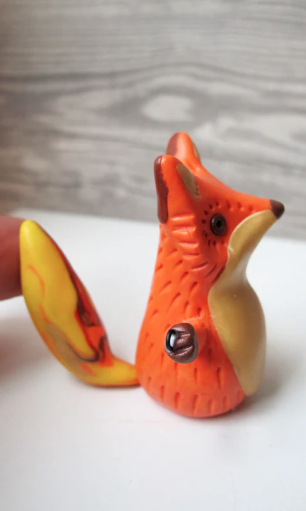
Roll out a tail shape proportional to the size of your fox with scraps of clay.
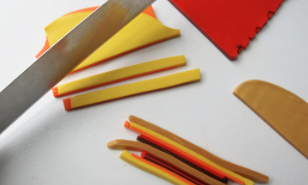
Take a piece of Soufflé Pumpkin, Fimo Soft 16 Sunflower or Sculpey Soufflé Canary, Chocolate/Bronze mix and Fimo Effect Metallic 11 Gold and one at time run the piece through the #1 setting of the conditioning machine. To vary the size thickness you can run a few colors in the #3 setting as well. Cut 3mm slices of each color and stack them so they are the length of your fox's tail.
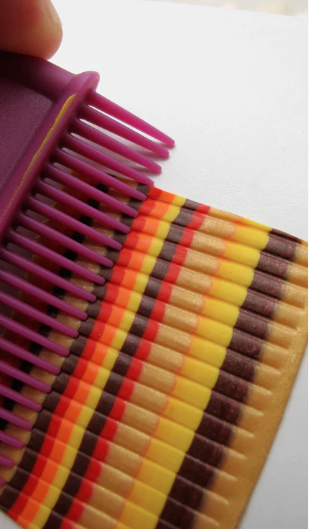
Run the piece in the #5 setting of your condition machine. Cut piece large enough so it will wrap around the tail. Then take your Comb at the top of your stripes and drag down your clay creating the dragging texture, you can do this with a dragging tool, a toothpick or try the Sculpey Stippling Tool and make a more furry like texture.
Always try this technics before, on a piece of clay. Don't use a tool for the first time on a piece that is almost done, try it out before on a piece of scrap clay.
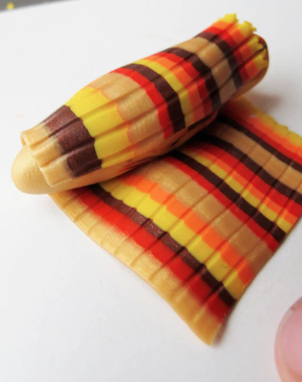
Decide which color end you want the tip of your tail color to be, then take a piece of that color clay and apply a piece to the top of the tail. Now wrap your texture around the tail and blend together. Flatten the end of tail and attach to the bottom of the fox. For add strength insert the extra wire from the black eyelet into the tail.
OPTIONAL: If you want a base use a small circle cutter. For a little gold sparkle brush some gold powder pigment on the fox. Bake as directed above.
Create some greeting messages on the computer. Cut out with scissors and punch holes, string color wax twine and tie them to the eyelets.
And you're done!
More tutorials? Check here!